
| NEWS | |||||||
| ABOUT | |||||||
| PRODUCTS AND SERVICES | |||||||
|
| |||||||
| PLACE AN ORDER | |||||||
| DOWNLOAD | |||||||
| HELPFUL HINTS | |||||||
| FAQ | |||||||
| LINKS | |||||||
| SEARCH | |||||||
| SITE MAP | |||||||
| CONTACT | |||||||
| русский |
Full disassembly and assembly of the air conditioning systemAfter having read this chapter, you will learn how on the basis of the description given below about disassembly and assembly of the air-conditioning system it is possible to make replacement or service of any faulty element of system of air-conditioning independently. Attention: Before beginning of realization of the works connected to system of air-conditioning, it is necessary to familiarize with the safety precautions described in the first chapter of the second part to this book
| ||||||||||||||||||||||||||||||||||||||||||
|

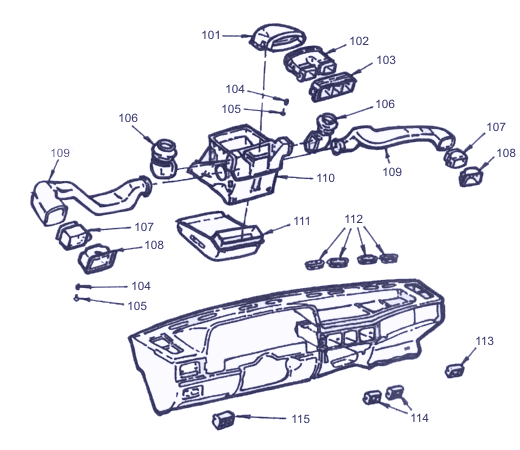
 Control panel
For removal of the control panel it is necessary to remove or disconnect:
- Negative wire of the storage battery Casing of the switching lever of a box of transfers (with manual control)
- Shelf for fine luggage
- Switch plate and the central console
- Two clamps, spring paw and to remove a casing 116
- Cable of a temperature regulator from the driven lever 118 and a air distributor casing
- Screw 121 located under the control panel
- Electric and vacuum connections and the panel 120
Installation is made in a return sequence.
Fan casing
For removal of the fan casing, it is necessary to remove or disconnect:
- Negative wire of the storage battery
- Air cleaner in gathering
- Electric connections
- Vacuum hose from the vacuum gauge
- Block of resistors of the fan electric motor
- Vacuum hose from the inlet pipeline
- 4 nuts, 2 screws and a casing
Installation is carried out in a return sequence.
|
Fan electric motor
For removal of the electric motor it is necessary to remove or disconnect:
- Negative wire of the storage battery
- Electric connections of the electric motor
- Air line from supercharger casing
- Screws of electric motor fastening to the casing
- Electric motor in gathering with the fan
- Fan fastening nuts, to remove the fan from the electric motor shaft
Installation is carried out in a return sequence.
Regulator of air distribution
For removal of a regulator it is necessary to remove or disconnect:
- Negative wire of the storage battery
- Air-conditioner control panel
- Vacuum and electric connections from a regulator
- Fixing screws and regulator
Installation is carried out in a return sequence.
Temperature regulator
For removal of a regulator it is necessary to remove or disconnect:
- Negative wire of the storage battery
- Air-conditioner control panel
- Cable of a temperature regulator
- Fixing screws and regulator
Installation is carried out in a return sequence.
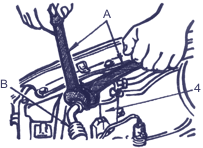
Fan cutoff switch and high pressure cutoff switch
|

For removal of the fan cutoff switch, it is necessary to remove or disconnect:
- Negative wire of the storage battery
- To unload KB system
- To lift the automobile
- Heat-reflecting screen, preliminary removing 3 nuts
- Arm with adjusting rod
- Electric connections of the cutoff switch
- Cutoff switch from the compressor back cover
For installation it is necessary to attach:
- Cutoff switches 8 and - or 9 with new sealing rings
- Electric connection
- Arm with adjusting rod (only for the high pressure cutoff switch)
- Heat-reflecting screen
- To low down the automobile
- Negative wire of the storage battery
- To pump out air and to charge KB system with a refrigerant
- To check up tightness of KB system
|

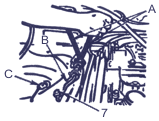
Low pressure cutoff switch
For removal of the low pressure cutoff switch, it is necessary to remove or disconnect:
- Negative wire of the storage battery
- To unload system KB
- Electric connection
- Cutoff switch 7 from the pipeline
Attention: At replacement of the low pressure cutoff switch 7, it is necessary to set up a new sealing ring and to turn the valve with the moment 10 Нм. It is forbidden to exceed the specified value of the moment. Installation is carried out in a return sequence.
Baffle of air recycling
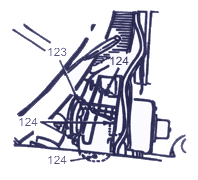 For baffle removal, it is necessary to remove or disconnect:
- Negative wire of the storage battery
- Windshield wiper levers
- Fastening screws and halves of wind shield
- Hoses of atomizers of glass cleaners and condensation from forward shield
- Vacuum gauge and fastening collars of electroposting
- Water-reflective shield
- Vacuum pipelines
- Four screws 124 and baffle 123
Installation is carried out in a return sequence.
Pipeline connecting evaporator with throttle branch pipe
|
For removal of the pipeline it is necessary to remove or disconnect:
- Negative wire of the storage battery
- To unload KB system
- Nipple connection from a throttle branch pipe
- To lift the automobile
- Nipple connection of pipelines from the evaporator
For installation it is necessary to attach:
- Nipple connection of the pipeline to the evaporator
- To low down the automobile
- Nipple connection to throttle branch pipe
- Negative wire of the storage battery
- To pump out air and to charge KB system with a refrigerant
- To check up tightness of KB system
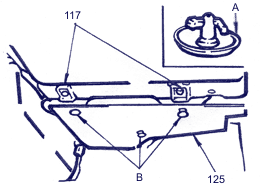
Heater heat-exchanger
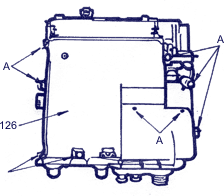 For removal of heat-exchanger, it is necessary to remove or disconnect:
- Negative wire of the storage battery
- To block the heater hoses with the help of spring clips
- Heater hoses from heat-exchangers
- Drainage hose of the evaporator from the case of a heater
- Casing of the switch lever of a box of transfers (with manual control)
- Shelf for fine luggage
- Switch plate and central console
- Two collars, two fastening bolts 17 of gloving box
- Fastenings of noise-isolating panels and panel 125
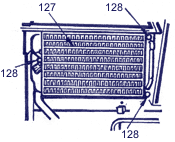
- Two clamps, holder tab and external casing 116 of the heater body
- Three clamps and a casing 16 of the heater body
- Nine screws A and casing 126 of heat-exchanger
- Three holders 128 and heat exchanger 127
 |
 |
А – fastening detail |
А – clamp |
For installation it is necessary:
- Heat exchanger 127
- Casing 126 of heat exchanger
- Casing of 116 of the heater body
- External casing of the heater body (if is present)
- Noise-isolating panel 125
- Gloving box
- Forward central console and switch plate
- Shelf for fine luggage
- Casing of the switch lever of a box of transfers (with manual control)
- Hoses to a forward board
- To fill in system of the engine refrigeration
- To check up tightness of the refrigeration system
- Negative wire of the storage battery
 |
 |
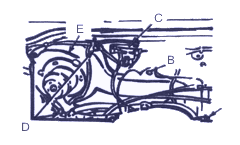
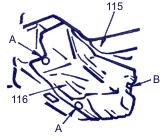
Evaporator heat-exchanger
 For removal of heat-exchanger, it is necessary to remove or disconnect:
- Negative wire of the storage battery
- To unload KB system
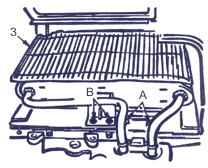
- Heat-exchanger of heater 127
- Pipeline between a receiver and the evaporator and nipple connection of a throttle branch pipe to a forward board
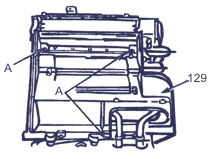
- Three screws of fastening A and a casing 129 of the evaporator heat-exchanger
- Two bolts B from the heat-exchanger arm
- Two collars of pipelines А
- Heat-exchanger of the evaporator 3
 For installation it is necessary to attach:
- Heat-exchanger of the evaporator 3
- Collars of pipelines
- Bolts of the exchanger arm
- Casing of heat-exchanger of the evaporator 129
- Pipeline between a receiver and the evaporator and nipple connection of a throttle branch pipe to a forward board
- Heat-exchanger of the heater 127 Negative wire of the storage battery
- To pump out air and to charge KB system with the refrigerant
- To check up tightness of the system
| ||
|
Complete set of the air-conditioner pipelines
For removal of pipelines it is necessary to remove or disconnect:
- Negative wire of the storage battery
- To unload KB system
- Pipelines from receiver, condenser and the compressor back cover
- To lift the automobile
- Heat-reflecting screen
- Dual pipeline in gathering
For installation it is necessary to attach:
- Dual pipeline in gathering to the compressor
- Heat-reflecting screen
- To low down the automobile and to attach pipelines
- Negative wire of the storage battery
- To pump out air and to charge KB system with the refrigerant
- To check up tightness of system
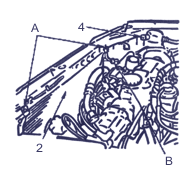
Receiver
For removal of a receiver it is necessary to remove or disconnect:
- Negative wire of the storage battery
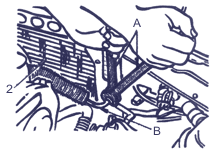
- To unload KB system
- Union of the pipeline of the evaporator B
- Union of the pipeline of the evaporator A
- To close apertures with protective capsules or fuses
- Fastening bolts of a receiver C
- Receiver 4
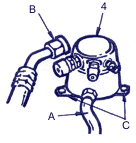 Attention: To show care not to damage isolation.
For installation it is necessary:
- At installation of a new receiver to pour in it 105 ml of pure refrigerating oil
- To attach fastening bolts of the receiver tabs
- To attach pipelines of the compressor and the evaporator
- To connect a negative wire of the storage battery
- To pump out air and to charge KB system with the refrigerant
- To check up tightness of the system
Attention: Protective capsules from unions of a new receiver should be removed only directly before connection of pipelines.
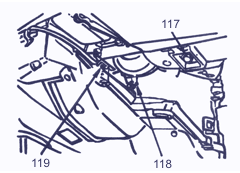
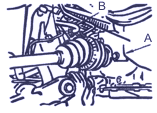
Compressor
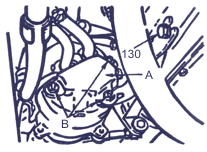 For removal of the compressor it is necessary to remove and disconnect:
- Negative wire of the storage battery
- To unload KB system
- To lift the automobile
- Fastening nuts of heat-reflecting screen B, bolt of 130 racks, heat-reflecting screen A and the rack
- Electric connections of the compressor
- To weaken bolts of 131 fastenings of forward and back arms and an adjusting nut 133
- Adjustment bolt 132 of driven belt tension
- Driven belt 135
- Fastening bolts of forward and back arms and the compressor 1
For installation it is necessary to attach:
- Bolts of the compressor
- Driven belt 135
- Adjustment bolt 132 of driven belt tension (not to tighten finally)
- Block of connection of pipelines
- Electric connections of the compressor
- Heat-reflecting screen and the rack
- To adjust driven belt tension of the compressor 400+/-50 Н
- Adjustment bolt 132 of driven belt tension
- Fastening bolts of the compressor
- To low down the automobile
- Negative wire of the storage battery
- To pump out air and to charge KB system with the refrigerant
- To examine the signs of outflow of the refrigerant. At detection to remove outflow to pump out air and to charge system KB with the refrigerant
Condenser
|
For removal of the condenser it is necessary to remove or disconnect:
- Negative wire of the storage battery
- To unload KB system
- Bottom hose of the refrigerating system from the radiator
- Top hose of the refrigerating system from the engine
- To shift bowl of the steering amplifier (if is present) to a forward board
- Radiator
- Electroposting of the refrigerating system fan
- With the plug of the low pressure switch 7, switch of low pressure
- Plug of the low pressure switch of 7
- Union of the pipeline of the condenser from a throttle branch pipe
- Union of the pipeline of the compressor from a receiver. To close apertures with capsules or fuses
- Union of the pipeline of the compressor from the condenser
- Fastening bolts of pipelines
- Two bolts
- Heat-exchanger of the condenser 2, nipple connection of the pipeline from heat exchanger of the condenser
|
For installation it is necessary to attach: Nipple connection of the pipeline to heat exchanger of the condenser.
- Heat exchanger of the condenser 2
- Two bolts
- Fastening hoses of the pipeline
- Union of the pipeline of the compressor to the condenser
- Union of the pipeline of the compressor to a throttle branch pipe
- Plug of the low pressure switch 7
- Electroposting of the refrigerating system fan
- Radiator
- To screw on its place the bowl of the steering amplifier (if is present)
- Top hose of the refrigerating system to a branch pipe of the engine
- Bottom hose of the refrigerating system to a radiator
- To fill in the system with the cooling liquid
- Negative wire of the storage battery
- To pump out air and to charge KB system with the refrigerant
- To check up tightness of KB system